USB Modem Lock-in: The Reason to buy a 3rd party 3G USB modem

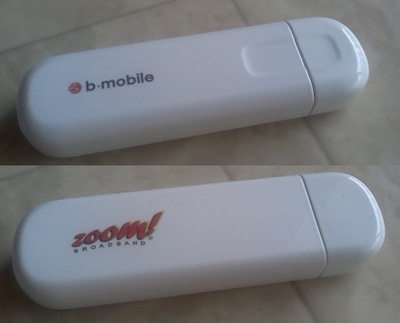
What happens when you put a DST SIM card into a b-mobiled branded TechFaith Flying Angel 46 USB 3G modem as shown below?

You get a bunch of fail as the modem is locked. This is a reason to buy a 3rd party 3G USB modem as it should support any SIM card and thus will be useful for bringing overseas as well. I contacted b-mobile who told me to contact the manufacturer. I tried to email but did not get any response from them. Perhaps it’s round 2 for trying to contact them or try to learn the inner workings for locking and unlocking modems.

Getting the b-mobile Zoom! Modem to work in 64-bit Windows 7

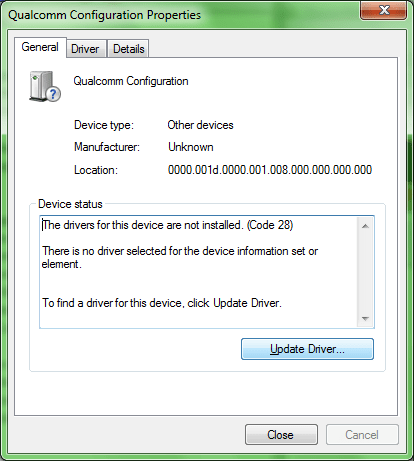
When you connect the b-mobile USB 3G modem (TechFaith Flying Angel) to a 64-bit Windows 7 computer, it does not seem to be detected / the drivers are not installed automatically. The drivers need to be installed manually after installation of the modem software as shown below.

Summary: Use drivers located in “C:Program Files (x86)b-mobilePocketmodem Connection ManagerInstallDriversdriversQUALCOMTDRV_QUALCOMAWinVistaX64”. This worked in 64-bit Windows 7 Home Premium and should work in 32-bit Windows and other Windows 7 versions

Pictorial Installation Guide

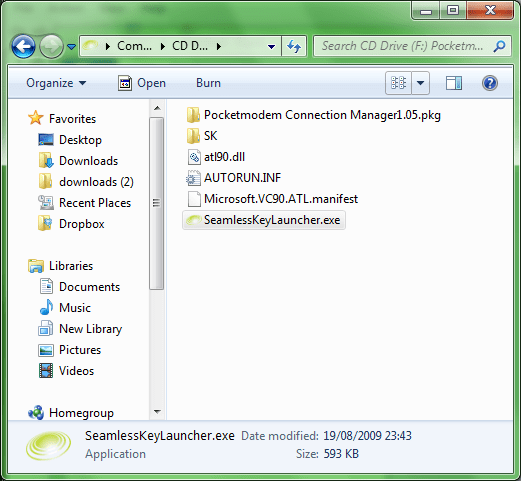
  1. Install Modem Software (SeamlessKeyLauncher.exe in CD drive that shows up when connecting the modem)

  2. After installation, go into “Device Manager” (Control Panel > System and Security > System > Device Manager in the side bar)

  3. Find “Qualcomm Configuration” under “Other devices” and “Mobile Connect” under “Ports (COM & LPT)”.

  4. Right-click > “Properties” > “Update Driver”

  5. Select “Browse my computer for driver software: Locate and install driver software manually” and then specify “C:Program Files (x86)b-mobilePocketmodem Connection ManagerInstallDriversdriversQUALCOMTDRV_QUALCOMAWinVistaX64” and click next to install the driver

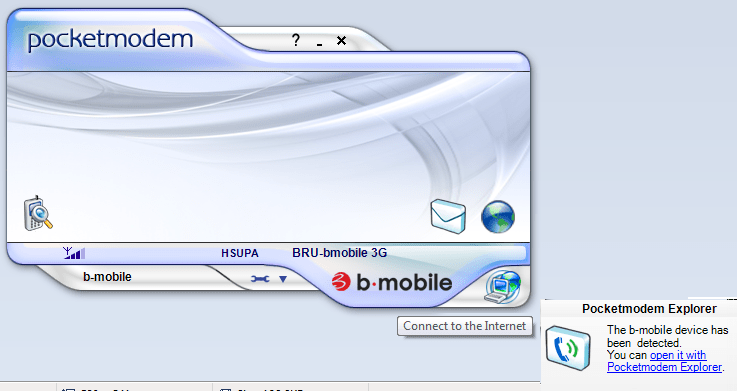
  6. Ensure that all unknown devices (I believe there are 3) and everything should work now. Connect to the Internet and be happy

Bmobile’s 1st Generation 3.5G HSDPA Modem in Ubuntu/Linux

bmobile's 1st Generation 3.5G HSDPA modem

Ever since I had the opportunity of using bmobile‘s 3.5G modem to get mobile broadband (via Zoom!) I was curious to see whether it would work in Linux. After much testing, I did manage to get it to work but it wasn’t consistent (it only seemed to work when the modem was tied to /dev/ttyUSB0, so I kepted plugging it in and out and redialed to see if it worked).

For the newer bmobile modem check out this page courtesy of @jikam

Test system: Running Ubuntu 9.04.

  1. Get usb_modeswitch (in Ubuntu / Debian you can “apt-get install usb_modeswitch” which makes things much easier)
  2. Get the usb_modeswitch.conf file and put it in /etc/
  3. The modem is identified an Alcatel One Touch X020 / X030 / MDB-100HU / Nuton 3.5G (lsusb will show ) so search usb_modeswitch.conf and uncomment the section for DefaultVendor, DefaultProduct, TargetVendor, TargetProduct and MessageContent

    ########################################################
    # Alcatel One Touch X020 (aka OT-X020, aka MBD-100HU, aka Nuton 3.5G), works with Emobile D11LC
    # Alcatel One Touch X030 (aka OT-X030, aka Nuton NT36HD)
    #
    # Contributor: Aleksandar Samardzic, Marcelo Fernandez

    ;DefaultVendor= 0x1c9e
    ;DefaultProduct= 0x1001

    ;TargetVendor= 0x1c9e
    ;TargetProduct= 0x6061

    # only for reference and 0.x versions
    # MessageEndpoint=0x05

    ;MessageContent="55534243123456780000000000000606f50402527000000000000000000000"

    ########################################################

    to

    ########################################################
    # Alcatel One Touch X020 (aka OT-X020, aka MBD-100HU, aka Nuton 3.5G), works with Emobile D11LC
    # Alcatel One Touch X030 (aka OT-X030, aka Nuton NT36HD)
    #
    # Contributor: Aleksandar Samardzic, Marcelo Fernandez

    DefaultVendor= 0x1c9e
    DefaultProduct= 0x1001

    TargetVendor= 0x1c9e
    TargetProduct= 0x6061

    # only for reference and 0.x versions
    # MessageEndpoint=0x05

    MessageContent="55534243123456780000000000000606f50402527000000000000000000000"

    ########################################################

  4. Do the actual mode switch for the modem to change the device from USB storage to modem mode:
    sudo usb_modeswitch
  5. Create the USB serial device for dial up:
    sudo modprobe usbserial vendor=0x1c9e product=0x6061
    This step created 3 devices (/dev/ttyUSB0, /dev/ttyUSB1, /dev/ttyUSB2) on my system.
  6. Use the Network Manager Applet to configure a new broadband modem connection with the B-Mobile configuration (APN: bmobilewap)

As mentioned this does not work consistently, so if it doesn’t seem to connection try plugging the USB modem out and back in and retry. I will try find a way to get this more consistent, but hopefully this will help those who are trying to get it to work

Using your phone as a Bluetooth modem in Linux

Software Package Requirements:

  • wvdial
  • bluez
  • bluetooth

Install packages for Ubutun/Debian systems
sudo apt-get install wvdial bluez bluetooth

Steps to get your Bluetooth modem working

  1. Turn phone’s Bluetooth connection and set to discoverable mode
  2. Scan for your device:
    sudo hcitool scan
    Result:
    Scanning ...
    00:11:22:33:44:55 MyPhone
  3. Search device to see if supports Dial-Up Networking (DUN) for use as a modem. Look out for RFCOMM channel
    sdptool search --bdaddr 00:11:22:33:44:55 DUN
    Result:
    Searching for DUN on 00:11:22:33:44:55 ...
    Service Name: Dial-Up Networking
    Service RecHandle: 0x1000f
    Service Class ID List:
    "Dialup Networking" (0x1103)
    Protocol Descriptor List:
    "L2CAP" (0x0100)
    "RFCOMM" (0x0003)
    Channel: 4
    Language Base Attr List:
    code_ISO639: 0x454e
    encoding: 0x6a
    base_offset: 0x100
    Profile Descriptor List:
    "Dialup Networking" (0x1103)
    Version: 0x0100
  4. Bind the modem on the RFCOMM Channel to a device
    sudo rfcomm bind /dev/rfcomm0 00:11:22:33:44:55 4
  5. Dial and connect (ensure your wvdial configuration is correct, for sample see below)
    sudo wvdial dstbt
    Result:
    --> WvDial: Internet dialer version 1.60
    --> Cannot get information for serial port.
    --> Initializing modem.
    --> Sending: ATZ
    ATZ
    OK
    --> Sending: AT+CGDCONT=,,"dst.internet"
    AT+CGDCONT=,,"dst.internet"
    OK
    --> Modem initialized.
    --> Sending: ATDT*99#
    --> Waiting for carrier.
    ATDT*99#
    CONNECT
    ~[7f]}#@!}!} } }2}#}$@#}!}$}%\}"}&} }*} } g}%~
    --> Carrier detected. Waiting for prompt.
    ~[7f]}#@!}!} } }2}#}$@#}!}$}%\}"}&} }*} } g}%~
    --> PPP negotiation detected.
    --> Starting pppd at Wed Aug 19 23:45:04 2009
    --> Pid of pppd: 17558
    --> Using interface ppp0
    --> local IP address 10.84.2.128
    --> remote IP address 10.6.6.6
    --> primary DNS address 202.152.64.27
    --> secondary DNS address 202.152.64.28
  6. You’re connected! Surf and enjoy the Internet!

Sample wvdial configuration file

  • Stored in ~/.wvdialrc
  • Change “dst.internet” to your provider’s APN

[Dialer dstbt]

Modem = /dev/rfcomm0 # modem device
Baud = 115200 # 921600 / 460800 / 115200 / 57600

Init = ATZ # far card with no PIN
# Init = ATZ+CPIN=”0000″ # for card with PIN, replace 0000 with your PIN

# If you know your ISP’s APN, specify it instead of YOUR_ISP_APN below.
# There’s also an APN table at https://wiki.ubuntu.com/NetworkManager/Hardware/3G .
# use one of the following 3 options. change to your providers APN
Init2 = AT+CGDCONT=,,”dst.internet”
#Init2 = AT+CGDCONT=1,”IP”,”YOUR_ISP_APN”
#Init2 = AT+CGDCONT=1,”IP”

# Most services/devices dial with *99# . A few seem to require *99***1#
Phone = *99#

# These often suffice, but your ISP might require different details. They’re
# often dummy details used for all users on the ISP, frequently the ISP’s
# name, but some ISP’s do require you to use a real username and password.
# any details possible
Username = internet
Password = internet

PS: bmobile customers change APN to “bmobilewap”

Using your phone as a modem via USB

image35

Though Bluetooth is a nice wireless way to use your phone as a modem, Bluetooth has it’s issues and sometimes it’s just not worth it when you can connect your phone via USB easily and without fuss. Using a USB cable would ensure faster transfer speeds over Bluetooth, if the maximum Bluetooth speed is capping your speed, and would also utilize less battery from your phone thereby giving advantages if you don’t mind the wires flowing around

Requirements:

  • Ensure your phone is configured to be able to connect to the Internet (example for DSTCom Brunei)
  • Drivers for the phone to be recognized as a modem on your computer (should be on CD that comes with the phone, or in the installed software, or possibly find it online)

Notes:

  • Following guide is done on Windows XP, if you need a Mac version, do lend me your Mac and I can tried make 1 for you =)
  • To obtain maximum connection speeds, the modem’s maximum speed to maximum as detailed here


For All Phones

  1. Connect the phone and install necessary drivers to recognize phone as a modem
  2. Open up “Network Connections” in the “Control Panel” and a new connection should be created
    image41
  3. Use that connection and dial *99# to connect to the Internet
     

For Nokia Phones

Continue reading “Using your phone as a modem via USB”

Using your phone as a Bluetooth modem

As a follow up to “Configuring your phone for mobile Internet (DST)”, in this post I’ll detail how to use  your phone as a Bluetooth modem freeing you from the mess of wires and also providing a way to utilize tethering without installing bloated phone software like the Nokia PC Suite. Using this method also allows DST users with 3G SIM cards and 3G/3.5G capable phones to enjoy the great speeds of DST’s Go! without having to subscribe the the DST Go! service or buying the Go! SIM card or buying the USB modem.

Requirements:

  • Phone with Bluetooth
  • Computer with Bluetooth
  • SIM card with credit (duh)

Requirements for high speed Internet over 3G/3.5G

  • 3G/3.5G phone in 3G mode (3G only or dual mode is acceptable but not GSM)
  • 3G SIM card
  • 3G phone signal (for Nokia phones it is shown with a little “3G” icon under the regular signal bar)

Note1: if phone/SIM does not meet 3G requirements or no 3G signal is available, the phone will fall back to slower GPRS / Edge connection, but the Internet will still be accessible.

Note2: Not all 3G/3.5G phones are created equally and each have a maximum 3G speed that it can obtain. This can hinder These details can be obtained online from places such as GSMArena.com. E.g. Nokia 6680 max 3G speed of 384 kbps, Nokia E51: max speed of 3.6 Mbps.

My current configuration setup:

  • Windows XP Professional
  • Using “dst.internet” as the access point
  • HP Compaq nx6320 notebook
  • Nokia E51 / Nokia 6680 / Nokia 3110c

The following is the brief outline of the procedure utilizing “My Bluetooth Places” software provided by WIDCOMM preinstalled with the notebook, however the concept stays the same over any computer / Bluetooth software:

  1. Pair phone and computer
  2. Configure phone as a Bluetooth modem
  3. Create network connection dialing *99#
  4. Optional: set extra initialization command to:
       +CGDCONT=,,”dst.internet”
           where “dst.internet” is the access point to connect to

Despite the maximum speed defined in the modem settings is 921600 bps (= 900 kbps) which is less than 3.6 Mbps or 7.2 Mbps offered by Go! and typical phones, I have managed to get 1.5 Mbps connections using this Bluetooth method my previous speed tests so I’m not really sure what’s up with that.

Nokia Phones with Nokia PC Suite

Refer to this post. It is for USB connection, but follows the same concept

Detailed Pictorial

Continue reading “Using your phone as a Bluetooth modem”