ITLT: Ultrabook & the latest Intel HD Graphics

So I’m looking for a thin and lighter laptop like the Macbook Air and looking at all the ultrabook and it’s sad to see that it seems that only Apple combines the latest 4th generation Haswell Intel processor (with better battery life) with Intel HD 5000 Graphics (or above) at a reasonable price. The HD 5000 series have a pretty decent performance advantage over the 4000 series (also see notebookcheck.net stats).

Sony, Dell, Lenovo, HP, Asus and Samsung all seem to have Haswell CPUs but paired with the older 4000 series GPU instead of the latest 5000 series with a few exceptions in bold. (These are based on Australian sites and perhaps other countries may have different models)

So it seems there are only 2 non-Apple notebooks with HD 5000 series and both are high spec’d. Strangely the i7 model of the HP EliteBook Folio 1040 G1 with the HD 5000 doesn’t seem available and the one that i7 model with the HD 4400 goes for AU$3,199 (HP). The Asus Zenbook UX301LA model with the HD5100 seems to be super tricked out and is AU$2,865 (Scorptec) with the regular i5 version at $2,499 (AsusNotebook.com.au). The Airs start at AU$1,099  (11″) / AU$1,249 (13″) with a fully spec’d 13″ at AU$2,099 (i7, 512GB SSD, 8GB RAM). 

Even when ignoring the HD 5000 difference, I think all ultrabooks don’t meet the Air’s competitive price and spec combination (even when the Airs are configured with better RAM / CPU / storage). Hopefully with CES coming up, and the announcement of new ultrabooks, there may finally be a price competitive ultrabook to the MacBook Airs.


Note for personal future reference: 4th generation Haswell CPUs for each Intel Graphics series:

Creating a Brunei Apple App Store Account Without a Credit Card

As mentioned in our episode of Corner Geeks 8: The Brunei Apple App Store, the video below documents how to create a Brunei account without a credit card.

Do note:

  1. not all apps seem available (e.g. WhatsApp) but most seem there.
  2. no music / movies / TV shows available
  3. AV mentioned that they currently selling Brunei iTune gift cards

The gist of the process:

  1. Load the App Store in iTunes
  2. Search for a free app (e.g. Angry Birds)
  3. Download the free app
  4. Sign up from the dialog box
  5. Select "None" as a "Payment Method" section during the registration

I still think getting a US iTunes Account is still the best option as it is completely unrestricted. You can create a US account without a credit card, using the same method above but select US instead of Brunei. You will need to buy gift cards online though, and I have bought iTune gift cards from both PC Game Supply and Jerry Cards with good results so thus far. See which works best for you and join the ecosystem that has yet to be rivaled (especially outside the US).

Corner Geeks 8: The Brunei Apple App Store

Corner Geeks Logo beta 2
MP3 link (right click > Save Link As…)

A ‘live’ / non-Skype Corner Geeks recording this week as I sat down with @mfirdaus as we discussed the Brunei Apple App Store while also passing him the InstallESD.dmg file for Lion. We hope that this is the start of more services being opened to Brunei and perhaps a legal way for people to get music, movies and TV shows in the future.

Show Notes

  • Apple brings the iOS and Mac App Store to 33 new territories, including Brunei!

  • We can register with a Brunei Credit Card
  • AV Electronics, the premium reseller of Apple products, says they aren’t currently selling Brunei iTunes gift cards

  • Registration without a credit card is possible with the same hack/work around to register a US account without a credit card (try download a free app in the App Store and create an account from there)
  • Brunei just has an App Store, not a full iTunes store with Music / Movies / TV Shows
  • Not all apps available in the iOS App Store: e.g. WhatsApp (could be developer’s setting when publishing app or some other unknown restrictions)
  • Prices shown in store are in US dollars
  • App ratings are reset meaning Brunei apps could make it to the recommended list
  • Sources for US gift cards: PC Game Supply / Jerry Cards (I have bought once from each of these sellers before and can verify that they work)

Multiple Instances of VLC on OS X

Despite there being an option for Windows version of VLC, it seems to be absent in the OS X implementation of it. In order to run multiple instance of VLC on OS X you will have to open up Terminal and run the following command
/Applications/VLC.app/Contents/MacOS/VLC
Source

This assumes that you installed VLC into the Applications folder. Otherwise you will have change it to the appropriate path where it is installed. It seems that running multiple instances of a program is discouraged by Apple’s usability guidelines (as mentioned by the forum poster) which would be ironic as I believe QuickTime files in Windows all open in a new window / instance as opposed to using an existing one.

Canon CanoScan LiDE 20 on OS X 10.5.8

In order to get the Canon CanoScan LiDE 20 working in OS X 10.5.8 (and from the comment responses 10.6 Snow Leopard as well)

  1. Go to the Canon CanoScan LiDE 20 product page
  2. Click the “Drivers & Downloads” tab
  3. Select “Mac OS X” from the dropdown menu
  4. Download CanoScan Toolbox Ver. 4.1.3.0X (Direct Download Link)
  5. Download LiDE 20/LiDE 30 Scanner Driver Ver. 7.0.1.1aX (Direct Download Link)
  6. Install the CanoScan Toolbox first
  7. When installing the driver specify the “Plug-Ins” folder in the CanoScan Toolbox installation directory
  8. Open up the “CanoScan Toolbox, click settings and it should detect ScanGear CS 7.0X as the driver and scanning should work without a hitch
  9. The scanner is fully operational including the scanner buttons to scan, copy and email (the button actions can also be customized)

Update
Some tips that may help if you’re having installation problems

Playing Nice with Filesystems

If you have played around with any 2 of the 3 major operating systems (Windows, OS X and Linux) and start transferring files to and from external hard disk you will probably run into an issue with the type of filesystem you choose for your hard disk. Windows likes NTFS, OS X likes HFS and Linux likes ext. As you can see none of them are the same. Being different is not so much an issue, but being compatible and accessible to all is.

Based on default system settings:

  • NTFS is readable on all operating systems, but not writable on OS X. Most modern Linux distributions can write to NTFS drives
  • HFS is readable on OS X and modern Linux distributions, and not writable on Windows or Linux
  • ext is only readable on Linux and not writable on Windows or OS X.

or to put it based on operating system

  • Windows can only read and write to NTFS, nothing else
  • OS X can read and write to HFS and read NTFS
  • Linux can read and write to ext and NTFS and read HFS

Take note that there is also the older FAT32 filesystem that is fully supported for reading and writing by all operating systems but due to limitations of FAT32, I rather not consider this. Basically the main issues with FAT32 is that the maximum file size is 4GB and the maximum partition size is 32GB (actually Windows can’t format a FAT32 partition greater than 32GB but can read FAT32 partitions of more than 32GB. Use GParted or just filter this Google search to be able to create and format a partition of 32GB). If these are limitations you can deal with, for the sake for interoperability stick with FAT32.

Now to solve the problem of support for each filesystem in each operating system:

NTFS:

  • OS X: NTFS-3G + MacFUSE
  • Linux: NTFS-3G
  • I’ve been using NTFS-3G in Linux for many years and haven’t had any problems with it and so far it’s working well with OS X too
  • On another note if the NTFS drive is not unmounted properly or there are some issues with the file system integrity, it is necessary to use Windows scan disk to rectify the problem. Thus this requires a copy of Windows to fix the filesystem.

ext:

  • Windows: Ext2 Installable File System for Windows
  • OS X: Mac OS X Ext2 filesystem
  • I’ve had issues of only being able to mount an ext2 partition in Linux and it gave a mount error in Windows and OS X and was due to an inode issue as new Linux distributions create the file system with inodes of 256 bytes but Ext2 fs only supports the older version with 128 bytes. And the only solution is to back up the files, and reformat partition with inodes of 128 bytes (-I 128) and restore the files.
  • Filesystem integrity issues should be able to be fixed with “fsck” from a Linux distribution / live CD. The great thing about this is that you can get a Linux distribution for free and this recovery can be done with out any strings attached.

HFS:

  • Windows: MacDrive (US$50, read and write), Paragon HFS for Windows (read only)
  • Linux: Enabling HFS writing in Ubuntu
  • Note: I have not personally tested these so I cannot give first hand experience of how well it works or what issues can be had with this.
  • I believe that HFS+ journal
  • I would believe any filesystem repairs would have to be done in OS X (similar to NTFS and Windows) and if so this enforces that you have OS X at hand, and in order to have OS X you must have Apple hardware or a Hackintosh either way this is very restrictive.

So it is pretty easy to get full read and write support of all 3 default file systems on the 3 major OS’s but there are issues. So far I’m inclined to stick with ext2/ext3 just due to the fact that it has no restrictions in terms of filesystem repair. I’ve had many NTFS issues related to damaged filesystems that required Windows and the inconvenience of taking the drive out of my box to find a Windows box was too much.

Witch for the Mac

Ever want to be able to switch between windows quickly at the flick of a keypress? Yes you can do it with the Command + Tab shortcut that is build into OS X, but the problem is that it shows all applications not all windows open. Luckily there is Witch that fills in the gap.
witch keyboard shortcut badges

Witch installs as a preference pane in System Preferences and has quite a few configurations shown in the screenshots below. You can configure the shortcut used to activate Witch, however it can’t be remapped to replace the default OS X’s Command + Tab application switcher. Windows can be organized by application or window details (name / launcher / activity order) thus you are not constrained to a single configuration. Shortcut badges, is a nifty feature, as it adds a keyboard shortcut to the Witch menu. A badge with a number will show up next to the application window and show in the screenshot above, and a single number can be pressed to activate the appropriate window: an added shortcut and time saver.

Cons
On the down side, the application costs €9.95 (~US$15 / ~B$21), doesn’t show all windows and performance issues. While the application does not cost that much, it does annoy me that in order to get OS X to work the way I want it to, it seems I have to fork out more money for some application to fix the problem that shouldn’t even be there in the first place. With regards to Witch now showing windows, I notice the help dialog (e.g. Finder > “Mac Help” menu item) and Google Chrome both don’t show up in the Witch menu. I think the Help dialog could be an OS X issue because it is not accessible via default OS X application switcher (Command + Tab) nor through any windows switcher (Command + `). Seems like the Chromium / Chrome issue is known and it’s strange as it does show in Command + Tab. With regards to performance issues, I find that if I don’t use Witch all the time (sometimes I still use Command + Tab), when activating the Witch menu it takes a while to appear and sometimes it doesn’t appear at all.

Verdict

Witch provides a feature that OS X sorely lacks for keyboard users. However due to it not providing full keyboard access to any window in OS X, it defeats the purpose for me to buy it, especially since I use Chrome quite a bit. Maybe the next time around

Preference Pane Screenshots – Triggers
witch pref pane triggers tab

Preference Pane Screenshots – Behavior
witch pref pane behavior tab

Preference Pane Screenshots – Appearance
witch pref pane appearance tab

Update 1: Seems that X11 windows are not recognized either so GIMP users are left out in the cold by Witch too =(

My OS X Issues

So I recently got a 13″ Macbook Pro and after month with it as my full time operating system, here are my issues with the Mac OS X as a heavily keyboard dependent user who has been in a Windows and Linux (Ubuntu/Debian) world for many years.

Command + Tab Application Switcher

One of the things apparent to me when I used a Mac previously was that when you Command + Tab (Mac’s version of Window’s Alt+Tab) to switch between open applications, it won’t show all the current windows open, just the applications. So, for instance, if you have 3 Finder windows open, when I Command + Tab I will only see one icon as show below.

3 Finder windows, 1 Finder icon in the application switcher
3 finders 1 icon

I can see the rationale for this as it doesn’t clutter the application switcher screen but I personally do not like it. There is a way to switch between multiple windows of the same program (Alt + `)(Command + `) which is good that it is accessible but still the inconvenience of having to switch to the application before switching to the right window. This is detrimental to my workflow and productivity on a Mac. I guess to combat this, expose was created for window selection. Expose nicely lays out all open windows on one screen for the user to select and bring to the foreground, and it is even keyboard accessible. However it is not as efficient as alt+tabbing on Windows because each time expose launches, you would have to search for the correct window on the screen before clicking it and proceeding. Witch solves this problem but it will cost you (€9.95) and I’m actually surprised at how few people want this option (current score is: -21).

Expose in action on 3 Finder windows:
expose finder

Finder

Finder is the equivalent to Window’s Explorer used for file management. One thing that became apparent to me when moving between OS’s is that OS X likes to create hidden files on USB drives and these files are never show in Finder. You simply can’t show hidden files in Finder. I also like to go to the folders by typing in the location using the address bar in Windows. This is something I also cannot do easily with Finder: the “Go To Folder…” dialog box has no auto complete and just does not offer the flexibility of a address bar where I can type and search on the fly.

OS X’s “Go to the folder” dialog instead of an address bar
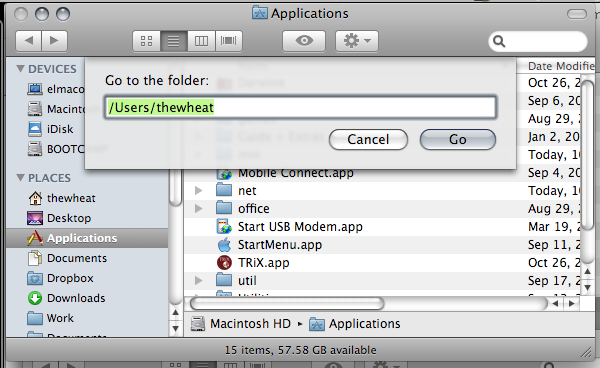
finder go to folder

In Finder you cannot list directories first. Thus if you’re trying to access a folder that is deep in your folder hierarchy, you are just searching the sub directories of a folder, you will find yourself searching for the folder among the files. There really needs to be an option for this.

Folders sorted together with files instead of before
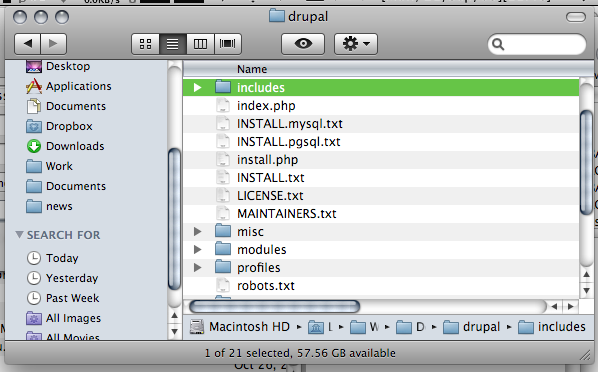
finder folders and files mixed

Cut and Paste
No copy and paste but cut and paste. Yes there is cut and paste in a text editor but there is none for file management in Finder. This is a big deal for me as I will use cut and paste very heavily in file management as it allows me to do all my file management via the keyboard. With Finder you’re forced to use the mouse to move files by dragging the folders into the necessary location. This ends up to be a huge time waster. It seems some 3rd party file managers (Path Finder and RAGE Macintosh Explorer) do implement cut and paste feature but if you cut files and forget to paste them (or you interrupt your cut with a copy and paste elsewhere) you can lose the files you previously cut. Windows and Linux has had cut & paste for years and here is Mac OS X without it. I find that hard to believe and also that only now in Snow Leopard you can restore your (accidentally) deleted file to the original location.

Replace not Merge
Take note that if you have 2 folders (A and B) of the same name and try to replace one folder with the other (drag folder A to folder B’s enclosing folder) do take note that it will replace folder B with folder A and not merge the 2 folders into one. Thus any files in folder B will be lost. This is very important and I can forsee a lot of cursing and swearing if this concept is not understood. For the record Windows merges the 2 folders giving the user with a folder containing files from both of the folders.
finder replace not merge

Menu Bar

So on a Mac the Menu Bar is always on the top and menu items change dynamically based on which application is currently in focus. The problem here is that you have to select the application first before being able to access any menu. So if you have another application window besides the current window you are using you cannot just access the menu item of the other window, you will have to click on the other window, move your mouse back up to the top of the screen where the menu bar is and file the item. Another time waster. You also cannot navigate menu items like you can in Windows. In Windows you can simply press the Alt key and menu bar is selected and thus you can use the navigation keys to move around the menu. Quick and simple. You can even use shortcuts to access menu items by pressing the key for the letter underlined in the menu. While you can place focus on the Menu bar in OS X using an awkward shortcut of Ctrl + F2 (am trying to find a way to mimic the single button Alt keypress in Windows) , there is no possible quick navigation of the menus.

On the right side of the menu bar there are icons/text that act as shortcuts to certain fuctions (e.g. wireless, bluetooth, volume control) or just for information display. The problem is that some programs have enough menu items to hide some of these icons and there is no way to view these icons in the hidden state. The only way around this is to remove functionality/information from the menu bar itself, preventing me from using it the way I want to. Windows has a feature to hide system tray icons and there is a toggle button to show them all. OS X needs a feature like this.

Menu bar in Mail – hiding some icons
menu bar mail
Menu bar in Finder – revealing hidden icons
menu bar finder

Window Menu

In Windows you can access the window menu by pressing Alt + Space. You can do things like maximize, minimize, restore and close the current window. You can even resize and move the window just by using the keyboard. That is just great and helps productivity. For OS X there is no window menu. You have to use the mouse to move and resize the window. Worse yet you can only resize the window my using the resizer in the bottom right of the window; you can’t resize from any other corner, ONLY the bottom right. I found that Afloat allows moving and resizing windows via the mouse as well as “always on top” and transparency features that I get with Compiz in Linux.

Zoom / (Smart) Maximize

In Windows the title bar has 3 buttons: minimize, maximize and close. In OS X you also have 3 buttons (on the left rather than the right), close, minimize to dock (-) button and zoom (+) button. Zoom does a ‘smart’ maximize that maximizes the window to occupy the optimal space, not the full screen. I can see that makes sense because when you maximize windows sometimes you get a lot of whitespace or useless space, but the issue with this is that it is inconsistent between applications and gets frustrating at times. So I found RightZoom that makes the Zoom button do a maximize like Windows and better still adds a shortcut to this.

OS X’s zoom button: love it or hate it
zoom button

Home and End

If you work with any kind of text in Windows I believe the Home and End buttons are your friends as they are mine. It seems these friends have had a change of heart in the Mac world. I’m using a standard (Windows) keyboard with and when I press the Home / End buttons they bring me to the start / end of the document I’m editing instead of the start / end of the line that I’m used to. I know there is the Command + Left / Command + Right to do this but call me lazy if I think an extra button to press too much inconvenience. Thankfully I found DoubleCommand which allows the Home and End keys to work as I expect them to.

Inaccessible window/dialog box that float on top

I found that there are some windows/dialog boxes that cannot be accessed via the keyboard application switcher (Command + Tab) or window switcher (Command + `). Open TextEdit (though I think it works in all applications), in the Menu bar > Help > TextEdit help. The window that appears is now inaccessible by the standard keyboard window selector shortcuts mentioned but can be accessed via expose. The worst part is that the window floats on top of everything you’re doing forcing me to reach for the mouse or find the window in expose. This can also happen if a samba share goes offline and you have it mounted

Mac Help window inaccessible via Witch (which is supposed to show all opened windows)
inaccesible help window

Keyboard inaccessible dialog box / help window
no selecteable dialog box same with help filepicture 1

Conclusion

These are my main issues with OS X and there are several other (minor) issues. As you can see there seems to be people with similar situations to mine as there are 3rd party applications developed to overcome these issues. After using a Mac I have realized that Macs jeopardize (my) keyboard skill portability due to the use of the command key instead of ctrl key for many functions and also due to the fact that Apple keyboards have a different layout. I guess the same can be said for long time Mac users in the Windows / Linux world but the fact that Apple not only dictates OS X’s the software but the Apple hardware and both ‘offend’ my quest for keyboard shortcut portability. Just as how Opera changed their new tab shortcut to Ctrl + T from Ctrl + N many version ago for consistency among the other tabbed browsers I can only hope and dream that Apple would give an option to make OS X shortcuts work like they do in Windows.