iOS 8 Shows Android How it’s Done

So iOS 8 has been released and it shows Android how to do things properly in terms of advanced notifications as well as the sharing menu

Advanced Notifications

iOS 8 advanced notifications allow you to respond right in the notification itselfiOS 8 advanced notifications

On Android you may some extra actions (there was none in the messaging app a.k.a Hangouts), but taking a reply action on an email bumps you into the Gmail app itself to reply
Android advanced notification
Android advanced notification reply

Sharing

Android has had sharing capabilities for ages (possibly since the first public Android release) however it is not consistent and seems to exists in at least 4 different variations.

1) Sharing in the Android Photos app (1st party application from Google): grid of large icons
Android sharing Photos

2) Android sharing in Skitch (3rd party application): a quick touch to share with the last application and going to the “See all” option expands the list and adds extra items to the bottom of an existing list

Android sharing Skitch

3) Android sharing in QuickPic (3rd party app). Selecting “More…” shows a whole new menu that has no correlation with the initial shortcut share menu
Android sharing QuickPic

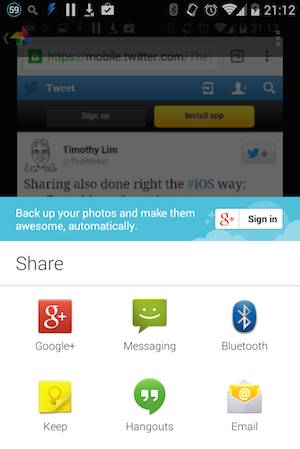
4) Android sharing in Chrome (1st party app from Google): another 1 touch quick share with last app but otherwise a full alphabetical list of share intents.

Android sharing Chrome

iOS 8 sharing: consistent look and ability to order sharing activities (order seems different based on app, i.e. Safari vs Photos, but at least the order is configurable)
iOS 8 advanced sharing

iOS 8 advanced sharing ordering

As an Android fan, it really bugs me that Android has had a lot of functionality but never seem to fully polish things up and strengthens the argument where Apple doesn’t necessarily innovate with new features but implement features in more usable forms.

Advertisement

Quickstart to Android Flashing Custom ROMs

Bootloader Android

I know I was a bit confused when initially rooting and installing custom ROMs on my Android device and while I don’t consider myself an expert there are a few terms that could use a quick definition to know your way around custom ROM installations.

Device Modes/States

When you start your device you can boot into 1 of 3 modes

  • Bootloader: a mode that can boot into Recovery or start the regular boot process (into Android) and also shows some details of your device. ROMs can be flashed in the bootloader but it is not the typical case
  • Recovery: a mode to flash ROMs (stock / custom)
  • Regular system boot: boots into the operating system while would typically be Android

Communication Tools

These tools can be used to communicate and even transfer files with your device

  • adb: when in recovery mode / standard Android
  • fastboot : when in bootloader

Unlocking the Bootloader

Bootloader

Boot loaders can be locked which prevents custom ROMS from being flashed. Unlocking the bootloader can be done with the following commands (this was done on a Nexus 7 2013, other devices may need other commands)

  1. Reboot into the bootloader
    adb reboot bootloader
  2. Unlock the bootloader
    fastboot oem unlock

Bootloader unlockBootloader unlock icon

Once the bootloader is unlocked you can install a custom ROM. While I believe it is possible to install custom ROMs without a custom recovery program, the typical way to install a ROM is with one. I’ve used ClockWorkMod Recovery and Team Win Recovery Project (TWRP) but there are others other there. Just make sure you install the right one for your device.

Flashing a Custom ROM

Custom Recovery TWRP

  1. Install a custom recovery
  2. Install it on your device
  3. Download your custom ROM
  4. Reboot your device into recovery
    adb reboot recovery
  5. Follow the on screen instructions to install the ROM
    1. Typically you have to wipe your device (dalvik cache, system and personal data)
    2. Install the custom ROM from a zip file
  6. Reboot into your new ROM

Custom ROMS

  • Custom builds/implementation of Android with some famous ones such as CyanogenMod and ParanoidAndroid (currently I’m using OmniROM)
  • Stock ROMs are the original ROM that came with the device
  • Custom ROMs typically will not have the Google services and usually need to be manually installed. Typically packaged / called gapps
  • Some problem with custom ROMs is usually hardware support: some things may not work as well as they do on stock ROMs. Thus custom ROMs that are based on stock ROMs will probably have better hardware support compared to generic custom ROMs

Rooting

Other Terms

  • “Unlocked”: this can mean several things
    • Unlocked from a carrier: it can us SIM cards from any carrier
    • Unlocked bootloader: it can load custom ROMs

Things I’m still unsure of

  • If the bootloader needs to be unlocked in order to flash a custom recovery
  • “Secure boot”: shown on the boot loader but doesn’t affect flashing a custom ROM

Links

Android adb Goodness

Thanks to the Ubuntu Touch install page I found out that you can do a full Android backup of apps and data.

Backup

adb backup -apk -shared -all

That will create a backup.ab file on your computer which can get huge

Restore

adb restore backup.ab

Restoration can be done even on a different ROM and it even maintains settings apps which require you to log in.

Full details of adb backup are as follows and you could selectively backup important app data and such.

adb backup [-f <file>] [-apk|-noapk] [-obb|-noobb] [-shared|-noshared] [-all] [-system|-nosystem] [<packages...>]
 - write an archive of the device's data to <file>.
 If no -f option is supplied then the data is written
 to "backup.ab" in the current directory.
 (-apk|-noapk enable/disable backup of the .apks themselves
 in the archive; the default is noapk.)
 (-obb|-noobb enable/disable backup of any installed apk expansion
 (aka .obb) files associated with each application; the default
 is noobb.)
 (-shared|-noshared enable/disable backup of the device's
 shared storage / SD card contents; the default is noshared.)
 (-all means to back up all installed applications)
 (-system|-nosystem toggles whether -all automatically includes
 system applications; the default is to include system apps)
 (<packages...> is the list of applications to be backed up. If
 the -all or -shared flags are passed, then the package
 list is optional. Applications explicitly given on the
 command line will be included even if -nosystem would
 ordinarily cause them to be omitted.)

Another great adb command is screen recording which I believe is only in Android 4.4 (KitKat) and above

adb shell screenrecord /sdcard/test.mp4

Ctrl+C to stop recording the video

If you have multiple devices connected, use -s deviceID to spec

adb devices
# List of devices attached
# 00bb1122 device
# 0022334455 device
adb -s 0063686250152c5a shell

Considering Android Development: A bit of basics and then some

Considering Android Development Slidedeck

This was the talk I gave at GDG Brunei DevFest 2013 and I aimed for the content to be basic and accessible with a workable app, so that the attendees could use it as a starting off point for the hackathon, should they want to learn how to build an Android app.

I should have published the APK on the Play Store before the talk so that people could have downloaded the app and see what I was building as part of the talk

Source code: https://github.com/CornerGeeks/GDGBruneiDevFest2013/

Use your Android Phone as a Wireless Adapter for your Computer

So my Linux install going messed up somehow and I was left with no wireless driver installed. I know that you can use Android phones to USB tether mobile data (e.g. 3G/4G/LTE) but I didn’t know that you can do the same over WiFi!

Image

Image

Now while in OSX I’m pretty sure it worked out of the box previously, it seems that you need now need to download the HoRNDIS driver. With Linux (Ubuntu) it worked out of the box and in my previous usage of USB tethering, Windows should work automatically as well.

IP and Me – Android App

Image

A simple network utility that:

  • lists all network interfaces and their IPs
  • is a small package (51KB apk file)
  • ad-free

Play Store link | Direct APK link

This spawned out of me noticing that many network capable Android apps ignore the Bluetooth or WiFi Direct Peer-to-Peer networks: they don’t seem to work despite it being a network with an IP (e.g. AirDroid). While this app doesn’t solve that problem, it does help me to know what IPs I have. Some may ask, why didn’t I just look through the Play Store, and while that is a valid question, it probably would take more time looking for an app that meets the 3 key points of IP and Me and also, is a good learning platform to start learning Android development in a more structured manner.

Is My Google Maps Broken?

Phone, Laptop, Tablet: All clicked on the same ‘address’ link from Android Australia MeetUp page and the Nexus 4 location is incorrect (Nexus 4 and Nexus 7 opened the link from the Meetup app, while the laptop from the webpage)

Image

When opening the webpage link in Chrome for Android on both the Nexus 4 and Nexus 7, they both report the same incorrect place! So the Nexus 7 has changed marker positions…

Image

And now loading the link in the Meetup page on the Nexus 7 goes to the wrong location
Image

This is strange as a couple of months back, I had a similar situation shown below. The weird thing here is that both screenshots taken on Nexus 4s: just different ones (and obviously the one that didn’t work was mine!). Though taking a closer look shows that the non-distinct grey circle indicates the correct location. But why are the views so different? But whatever it is, all I know is that Google Maps has

Image

Android Still has Low Phone Storage Space Problem

A couple years back I though that Android had a big problem with Low Available Phone Storage Space for apps and after reading Ausdroid’s recent review of the Medion 4, it seems that this is still an on-going issue.

The device in question is the Medion 4 which is advertised with “4GB Memory” on Aldi’s site, but according to AusDroid, there is only 500MB allocated for apps (the rest of the space can still be used to store photos/files but not apps without some rooting and hacking).

Filesystem             Size   Used   Free   Blksize
/data                  503M   151M   351M   4096

My 16GB Nexus 4 has 12.9GB allocated to the /data partition which is a bit less than 13.6GB of a 16GB iPhone 4 (can’t seem to find a definitive answer for the iPhone 5) but is still a majority of its storage unlike the Medion 4. The Samsung Galaxy S4 has a separate issue which is not exactly the same but gives the same results to the end user: a false sense of storage space (only 8.8GB free from the 16GB model due to Samsung’s customization of Android with its own skin & apps). While it’s not as bad as the Microsoft’s Surface RT storage debacle (15GB free in a 32GB Surface RT, 28GB free in a 64GB Surface Pro. Source: Microsoft’s Surface Disk Page FAQ), both of these situations don’t give me much confidence when recommending non-Nexus Android devices with X GB of storage.

At least if it is just Android customization (ala Samsung), flashing a custom ROM should be able to solve the problem. I’m not sure if the partitioning (ala the Medion 4) can be solved using a custom ROM, but even if it does, you will need to find a ROM that supports your device: so you hope that your devices isn’t a weird obscure one.

So when you buy an Android device, you can’t say for certain that you have a majority of the advertised storage available for apps. I can only assume that Nexus devices would give you the best experience in terms of not being ‘cheated’ for storage space, but I guess this gives more credence to the fact that Google has lost control of Android and that some manufacturers are still giving Android a bad name.

SMARTER eVCS Android app source

It is now available at: https://github.com/thewheat/SMARTER-eVCS-Android

The Android app is currently meant to be used in conjunction with the SMARTER eVCS webapp but hopefully I’ll get time to upgrade both the Android app the make it a standalone app.

Also once again, anybody interested in helping in this community development project, do get in contact or just get the code, make some changes and submit pull requests.

So You Want to Develop for Android – Google I/O Extended Brunei (2012)

An overview of Android development with a quick and easy way to get started in cross platform development (including Android) with PhoneGap, presented at Google I/O Extended Brunei. The presentation aims to provide attendees with basic understanding of Android development and providing them tools to create an actual application.


(this is a recorded presentation done after the actual event due to Internet connectivity issues during the event prevented an ideal recording environment)

Links

  1. Hackathon file list

    linked at http://tiny.cc/googleiobn complete with installation guide, tutorials, sample code and presentation slides used for the presentation

  2. PhoneGap Sample Code on GitHub

  3. “So You Want to Develop for Android” presentation slides

I prepared the materials assuming attendees would have no or very little Java programming background (which is needed for Android development) and thus a platform like PhoneGap was ideal as it provided an easy starting point into app development utilizing HTML and Javascript which are easier technologies to understand, and that more people would have exposure to. Based on the actual session, this assumption proved to be true and I believe was a good starting point and it has even spurred @mfirdaus to dabble with some Android development.

I highly encourage Brunei developers out there to contribute and give back to the community. During our time, there were no such developer events to my knowledge, and with social media, it is so much easier to get the word and out and just meet up and provide the young developers in the country with opportunities that we never had.

Footnote: Background

I was contacted by Cikgu Azaman (@azlinux) over a month ago regarding having a Google I/O Extended in Brunei. A hackathon was to be conducted and after throwing around a few ideas, I was put in charge of presenting an Android development session as in intro for the hackathon.

The event was held at iCentre on 27th June and while Internet connectivity didn’t allow a proper Google+ Hangout with a live video presentation (i.e. there was gagal-ness in trying to get things up and running) so we resorted to an audio Skype call while @mfirdaus went through the presentation slides at the Brunei side. So I thought it would be best to do a recorded presentation after the fact for a more complete presentation.